From 2D to 3D to Fabrication


Why exactly should you bother with 3D design before fabricating a custom project?


There are many answers to this question, and since I'm currently working on a custom processional cross for Jon Buell of Buell Custom Design, I can quickly point out a few things.
Usually I chat with a client, they tell me what they want and I put the design together, but Jon actually put together a beautiful cross design and sent it over to me. It looked fantastic! But as soon as I zoomed way in, the issues which needed to be addressed (and always do) popped up on my screen. Before I get into it, think of a great photo on your computer screen, but once you print it or try to enlarge it, all you see is pixilated image.  Well... sort of like that.
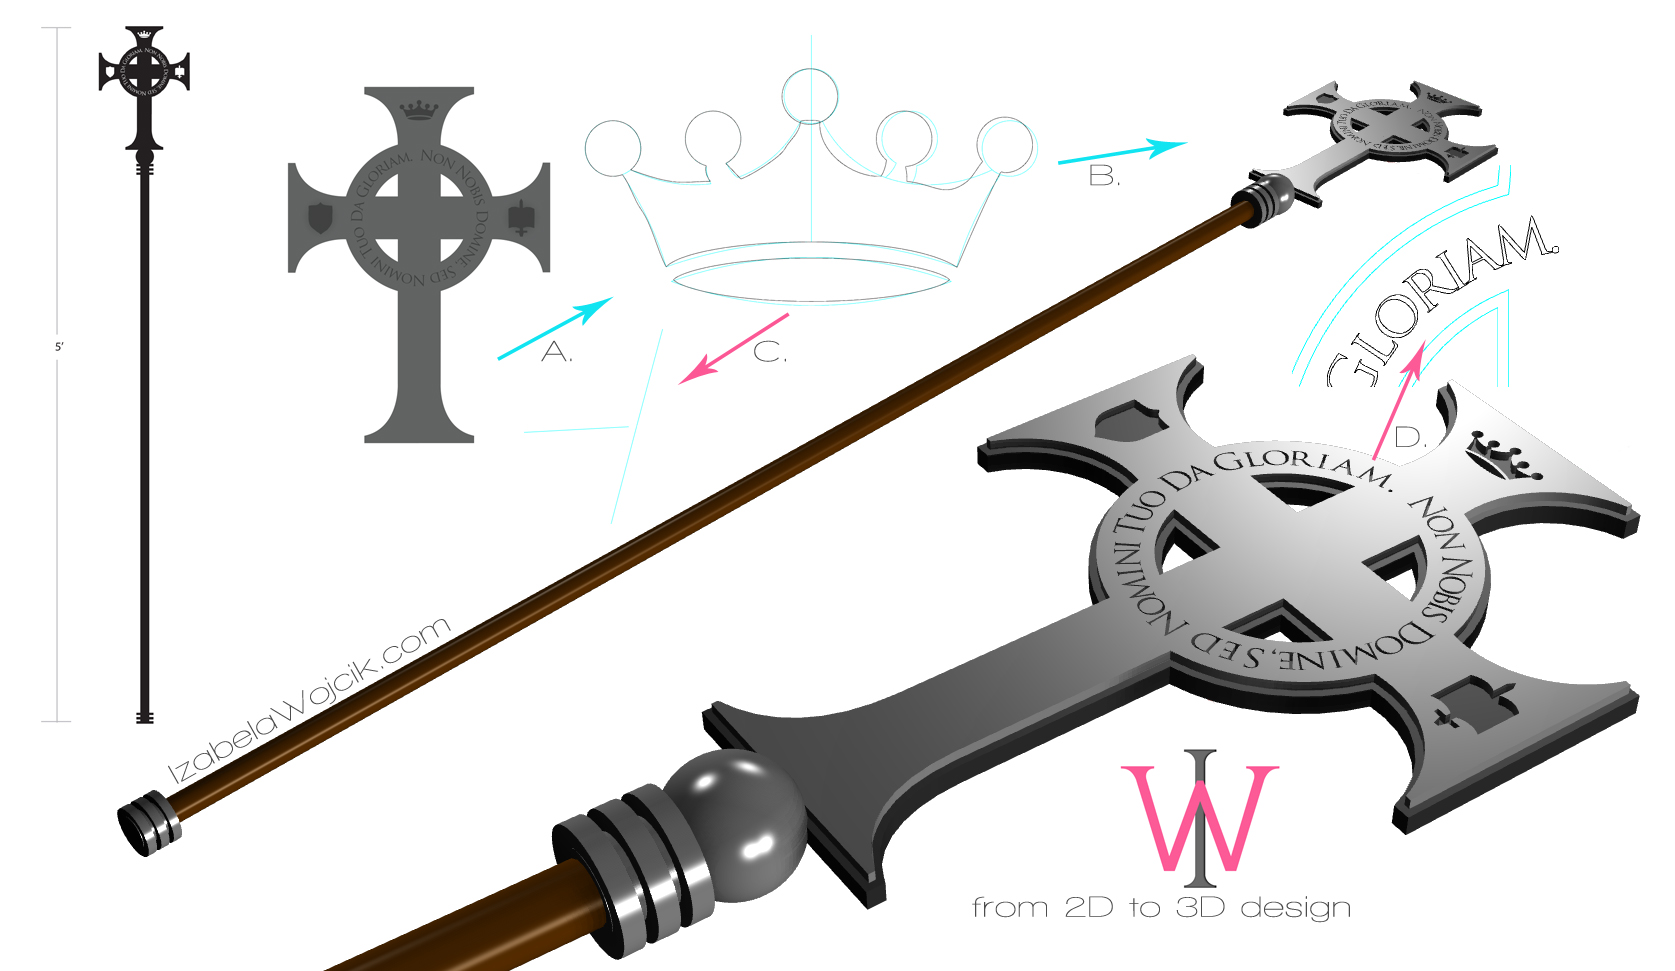
Take a look at the crown in the middle of the drawing. (click here for a larger picture) The black lines are a bit wavy (you don't notice that this happens, and it always does, unless you are working in a specialized program.) The blue lines are what I corrected and made sure that the piece is equally mirrored to both sides as well. Since this cross pieces will be initially be cut out of a metal plate by a laser or water jet cutter, the entire thing has to be programmed into the cutting machine. There are lots of people around town who do this sort of thing, but I like to work with Mike Boliver of Aquacut or Jason Brimberry of Ephesian Art; depending on what I need done. Both Mike and Jason work with an array of different programs, really work with you, and have a pretty quick turnaround time. Plus, they're absolutely lovable!
But... I'm derailing...
Another issue, and again, this happens frequently, is when two lines do not touch... like in the closeup of the blue lines. The laser or water jet cutter will run into all sorts of issues when this happens.
The third, and very important issue is that time is money! Each one of these lines has tiny little points on them. The laser is programmed to follow each line to each point. If you can get away with having one clean line, the laser will run smoothly over the entire area, and it takes less time... when the laser has to "think" about 40 points on the same line, you'll use up a whole lot of time. It's always better to clean up the images or simply start fresh and do this correctly in the first place. As you may have noticed, I did not re-design Jon's cross or the parts and pieces in it, I simply cleaned things up a bit and made them work for the machine. I also added the little step detail... if I'm going to cut two plates, I might as well use this extra detail in adding some texture to the piece. Take a look at the letters... I can tell that Jon used Illustrator to put the design together... but the problem with using this program is that once you make letters run across a circle, they will have spaces between them in some parts and, unfortunately, actually run together in other parts of the circle. I had to manually fix this problem and create spaces between each letter, or they would look a bit funny when cut out of a piece of plate.
Okay, so now that we had a little chat about line design and lasers, lets talk a bit about 3D design.
3 people can look at the cross in the upper left hand side of the drawing and imagine 3 very different ways of what the final piece will look like. This is precisely why I love designing the pieces in a 3D program, before they go into production. This way, all 3 of us will be looking at exactly what the final piece will look like, to the exact scale, with the exact dimensions, and the exact material sizes. After discussing the top drawing, we decided to handle this design in a different way. As you can see, the same design, an absolutely different cross! A little bit of work ahead of time saves a whole lot of time later on!


I can even give this cross a pretty good approximation of what the finishes will look like... that the wooden part will be oak, and the stain it will have, etc... but in this case, Jon and I already know what the finishes will look like, so the final 3D design has a more crude look to it.
At this point, I can ask Jon, "Do you like the front part of the cross being 1/8"? or would you prefer that to be a bit thinner?" It's so easy to make those decisions now, so that there are no regrets later on in the process. Changing little things in the world of custom while the piece is fabricated might not be a big deal some of the time, but other times it will hurt your pocket... preventing this is a good idea in my book!
After the two pieces return from the cutter, my guys will go to work on this cross and put the entire thing together. By doing all this ahead of time, I'm saving their time as well, and all of this translates to the piece being done correctly, as expected, and quicker than it would otherwise have. And this, of course, translates to saving time and money!
I don't need to go through these steps for every project, of course, but this one absolutely lends itself to it.
I'll be sure to thrown in a photo of the cross when it's done... you'll love it once it has all the hand worked nuances like the patina and so on worked in.

The worlds of art, design, and architecture are colliding! 3D Art Night: Digitizing Reality


3D printed figurine of an actual human, by Captured Creations.
Last night I went to Captured Dimensions, a 3D scanning and 3D printing studio in Plano, TX, where a whole lot of 3D artists, computer game designers, as well as traditional sculptors got together to participate in a talk given by artist Bridgette Mongeon.  So what do all these people have in common?

Let me start at the beginning...

Michele Azzaro, who works for the company, has been telling me about this 3D technology her company has been working on for a while now, and it all sounded great, but you know how pictures speak louder than a thousand words? Well, they do!  I got an invitation from Michele, via Facebook, and the invitation had a link to a video attached to it.  I clicked on the link  and was absolutely blown away!  You have to see this... the possibilities are endless... but to start with, think of little wedding cake figurines which happen to be exact replicas of the actual couple who are having the wedding.  Imagine this: Captured Dimensions snaps a single photo of you at the same time, 81 times, from every single angle you can imagine, transports it into their 3D environment, and prints you, exactly as you are in that place in time!  Fabulous!  I just couldn't wait to see more!


On the night of the event, I was pretty much knew what to expect, but was further blown away by the capabilities.  They can actually take a hand-held scanner and visit your home to scan a sculpture you have in your backyard and print little replicas of it, or a full scale replica, or even a larger one!  They materials they can print in are also many, not only plastics, but ceramics, etc... 

Now imagine manipulating your own images in 3D, basically sculpting in a virtual reality, and printing your sculpture into the real world.  Technology and art are starting to merge together for sure... and now your'e starting to get the picture of why Bridgette, an artist who sculpts people and animals, was there...


Brigette Mongeon is an artist, sculptor, writer, educator, public speaker, a wife, a mom, and a grandmother!  Due to an injury she sustained to her hand, she was no longer able to sculpt, and since sculpture is her life, her husband suggested virtual reality.  Her injuries healed eventually, but by then she was hooked!  She is currently using the 3D world to explore her ideas, to show her clients what their commissions will look like before they are brought into the physical world, and she also uses the 3D printing and CNC/ROBOTIC technology to print the base of the sculptures she created so that she can sculpt on top of that and make the sculptures her own.  Imagine the time being saved by not having to weld rebar and apply tons of stuff on top of it to come up with the skeleton of the piece.  (by the way, I can't wait for her new book to come out next year... lots and lots of great 3D and sculpture tips and secrets in that one!... I got a preview and the preview was fantastic, you should really check it out)


All of this is very exciting for the world of art, and I will most definitely keep this in mind for my next large scale sculpture project... I know that I most definitely could have used this technology for this tortoise I sculpted, which was cast in bronze, but it's also exciting for the world of home building and interior design as well.  Check out this video of circular staircase stringers being milled out out wood!  Unlike having to build this on-site, which takes a whole lot of men power, not to mention the oopsies, this bad boy produces extremely precise life size replicas of the design created in the wold of 3D.

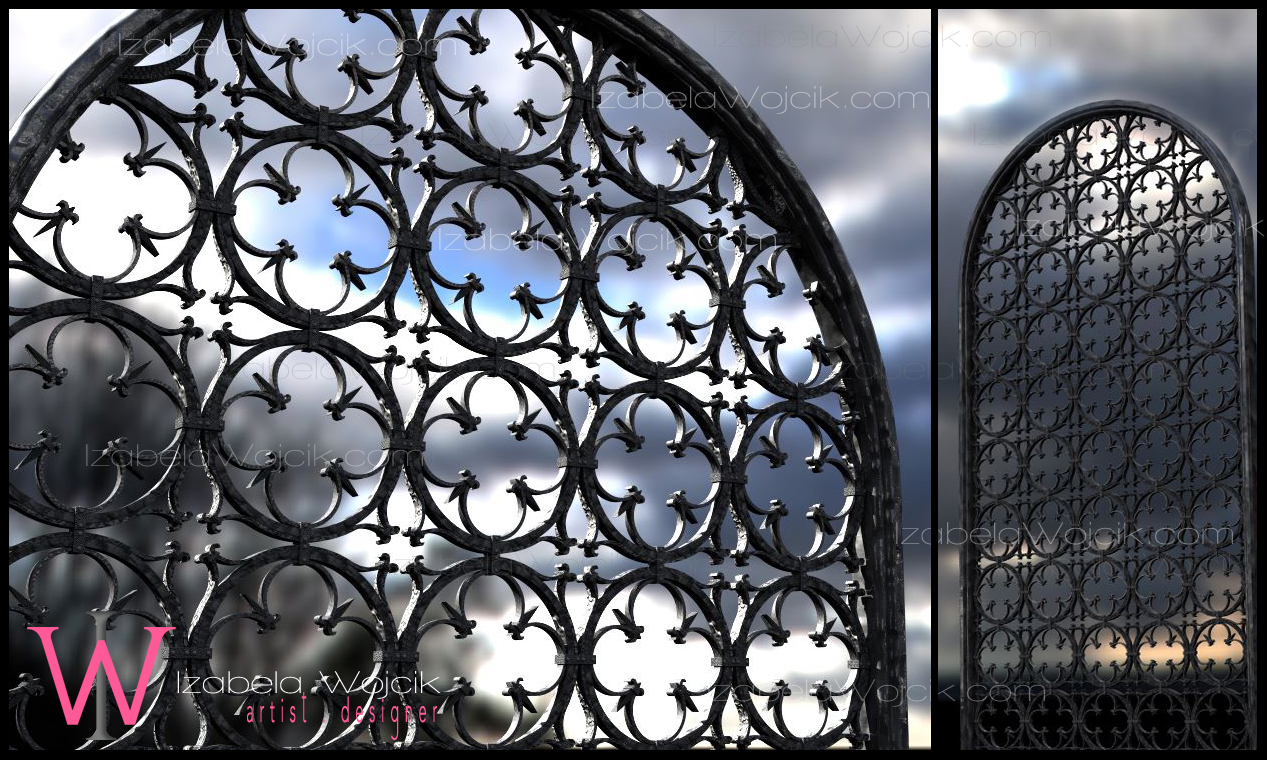
Since I am an ornamental ironwork and lighting designer, I absolutely love to use 3D technology to show my clients what their final projects will look like.  I've been doing this for just about 10 years; I know exactly how hard it is for clients to picture certain designs from a drawing on a piece of paper.  With 3D technology, nothing is off the table, depending on how far you're wiling to take it, you can pretty much accomplish anything.  Take, for instance, the photo below.  It's a quatrefoil gate design I put together on one of my 3D programs; wouldn't you say that it looks pretty real? ...all the way down to the finish.  I created it in real-world dimensions, so everything is exactly as it will be in our real world.  At this point I can superimpose this gate into a photograph of the stone columns it will actually fit in-between, and the client will see exactly what they will be seeing when the actual gate would be installed.  I put this particular design together for the purpose of hand forging, but since I have the file, I can now print little replicas, or actually CNC this design out of a single piece of metal.  I mean, how amazing is this?


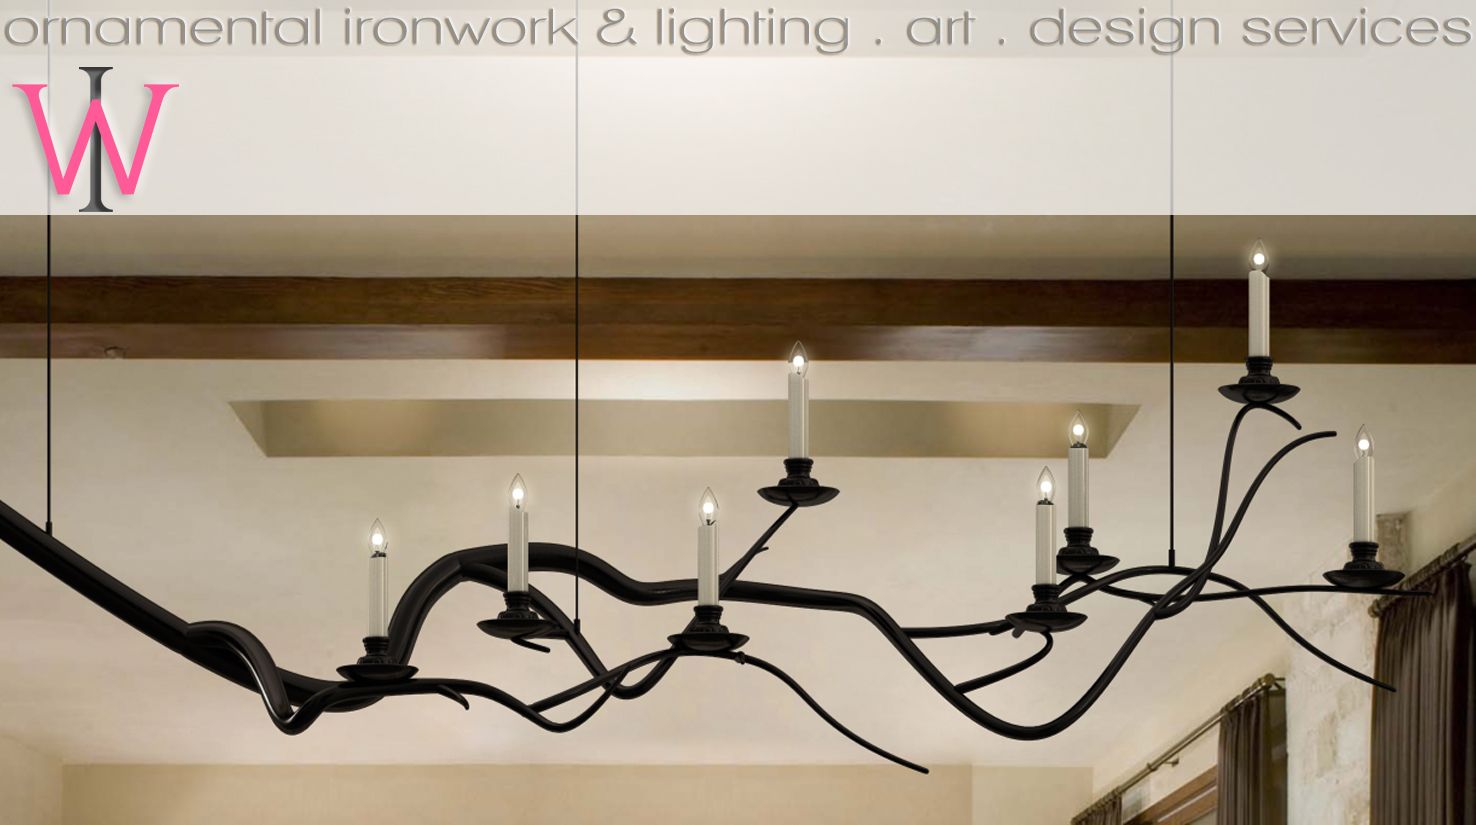
Anyway, I could keep going and going, but this post would become extremely long... I hope that this has sparked your imagination and you'll look a bit further into the technology.  I know that I have a whole lot of ideas floating around in my head, like 3D printed chandeliers like this one, which I also designed recently for the purpose of forging in wrought iron:


If you have any questions or great ideas, please comment below.  I'm posting a few pics from last night below... Chat with you soon!  Izabela

So, what am I holding in my hand? A tiny 3D family portrait, of course!
If you don't know Breanna Cooke, you should!  It's such a small world!  I was just admiring the costume she she made for herself a few months ago, I walk into Captured Dimensions and what do I see?  A little replica of Breanna in her costume!
Brigette and I, Norman Rockwell style!

Inside the Photo Booth!

Imagine! All these cameras and you're 3D!
...and a whole lot of comic con characters just love to go digital!
Okay, one more fun thing before I go... if you have a $100 burning in your pocket and you want a really awesome business card, get a hold of Michele or Jordan at Captured Dimesions... I saw theirs yesterday and was absolutely in love!

In the first photo, I'm holding their card against the background of one of my paintings, and I took a picture of that.  In the second and third photos, I scanned the card with the app on my phone, and a 3D image appeared on top of the card, which I could actually view from all sides, based on how I moved the card.  I took screenshots of what was there... isn't it fantastic?


to do this, you'll have to download this free app called Augment to your phone or iPad... just go to your apple store or what not and type in Augment.

scan this image with your phone or ipad (you can print the image or scan it from your computer screen) and there you have it... move the phone back and forth and the image will magically rotate... it literally sits on your business card.
Have fun!

Oh Goodie! The Rockitecture photo is here!


Greg Brown, the program director at the Dallas Center for Architecture, sent me a photo from Rockitecture! I did not attend this year, but I did donate one of my paintings for the auction... it's the one on the right:)
Thanks Greg!